
Getting Solar in Australia – The Step-By-Step Process
Getting Solar in Australia – The Step-By-Step Process
Welcome to your guide on the exciting journey of getting solar energy for your home or business in Australia. In this step-by-step guide, we aim to simplify the process, breaking it down into digestible stages from the initial consultation all the way to reaping the benefits of your new solar energy system.
When going through each step, it’s essential to note that there’s no one-size-fits-all approach to solar installations. The size and type of your system, whether you’re off-grid or grid-connected, as well as state-specific regulations can all affect the process. This guide serves as a general overview, and individual circumstances may vary.
It’s also important to note – Arkana Energy takes care of this entire process for you and makes it as stress and hassle-free as possible – some of the steps happen in the background without you even knowing. So don’t worry about the size of the list – that’s on us and is part of your solar package.
Now, let’s explore the typical steps involved in getting your solar system up and running:
- Step 1: Initial Consultation
- Step 2: Site Evaluation
- Step 3: Product Selection
- Step 4: Rebate Eligibility Check
- Step 5: Customised Proposal & Sign Off
- Step 6: Organising Finances
- Step 7: Tech Check
- Step 8: Grid Connection Application
- Step 9: System Installation
- Step 10: Certificate of Compliance (COC)
- Step 11: Grid Approval, Connection & EWR
- Step 12: Solar Meter Setup
- Step 13: System Activation and Monitoring
- Step 14: Changing Your Energy Usage
- Step 15: Ongoing Maintenance & Performance Reviews
- Final Step: Sit Back, Relax & Enjoy The Benefits
Haven't got a system yet? Get a free quote from Arkana Energy
Get a quoteStep 1: Initial Consultation
Your journey towards greener, more cost-effective energy starts with an Initial Consultation at Arkana Energy. During this meeting, we’ll discuss your specific energy needs, budget, and long-term goals to tailor a solar solution just for you. We’ll also explore rebate and finance options, so it’s helpful to have an idea of your budget and bring along your last few energy bills to understand your consumption patterns.
To prepare for this consultation, consider gathering your most recent 3-6 months of energy bills and jot down any questions you might have about solar energy, brand options, or financial incentives. This will help us get straight to the specifics, ensuring you get the most out of this important first step on your solar journey.
Step 2: Site Evaluation
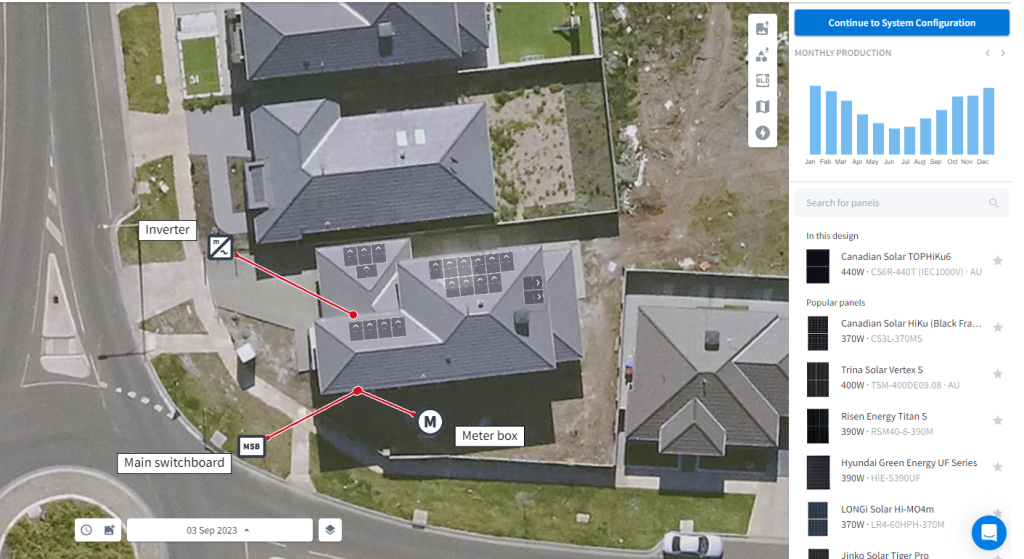
After the Initial Consultation, the next key step is the Site Evaluation. A skilled Arkana Energy expert will visit your property to conduct a comprehensive assessment and ensure your home can get solar. This isn’t just a quick look at your roof; it involves evaluating various factors like the roof’s condition, potential shading from trees or structures, and the roof angle to optimise your solar installation. The assessor will also review your home’s electrical system to ensure it’s compatible with your new solar setup.
The Site Evaluation is not just a technical procedure but also a chance for you to engage directly with our specialist. Feel free to ask any questions you may have during the visit, be it about the equipment, handling of unique challenges like shading, or seasonal performance of your future solar system. This step aims to provide you with a complete understanding of what your tailored solar solution will entail, leaving you both informed and excited for the journey ahead.
Step 3: Product Selection
After the site evaluation, it’s time to select the solar products that best fit your home and energy needs. We’ll help you navigate through the choices of solar panels, inverters, and, if applicable, batteries. Our access to top-tier brands like Sungrow, Fronius, TESLA, Seraphim/PowerWave, and CanadianSolar ensures that you’re choosing from a range of quality, reliable components. Together, we’ll consider various factors such as efficiency, cost, and warranty to help you make a decision tailored to your unique requirements.
To further refine our product recommendations and ensure a perfect fit for your home, we utilise advanced solar software such as Pylon or Nearmap. This tool allows us to model your solar system’s performance based on your specific roof layout and energy consumption patterns. The result is a system that’s not just efficient but also perfectly suited to your property.
Step 4: Rebate Eligibility Check
Before you get your solar panels up and running, it’s crucial to consider the financial incentives available to you. At Arkana Energy, one of our key services is to help you navigate the maze of rebates you could be eligible for. We’re talking about both federal government rebates, which can save you a substantial amount upfront, as well as state-specific rebates like Victoria’s Solar Rebate. These rebates are designed to make solar energy more accessible and can shave thousands of dollars off your installation costs. And don’t worry about the paperwork or eligibility criteria; we handle most of that for you.
Different states have different rules, and the type of installation you choose could also affect your eligibility. We make sure you have all the information you need to take full advantage of these financial incentives. Whether you’re eligible for a battery rebate or an incentive for energy-efficient appliances, our team will guide you through the entire process, ensuring you’re in the best position to make the solar transition as affordable as possible.
Step 5: Customised Proposal & Sign Off
After completing the site evaluation and confirming your eligibility for various rebates, the next pivotal step is your customised proposal. This comprehensive document is tailored to your unique needs and financial situation.
At Arkana Energy this is done via a solar modelling system called Pylon which ensures accuracy and tailors predicted return on investment to your home and the exact products being installed, and even where they are located on your roof.
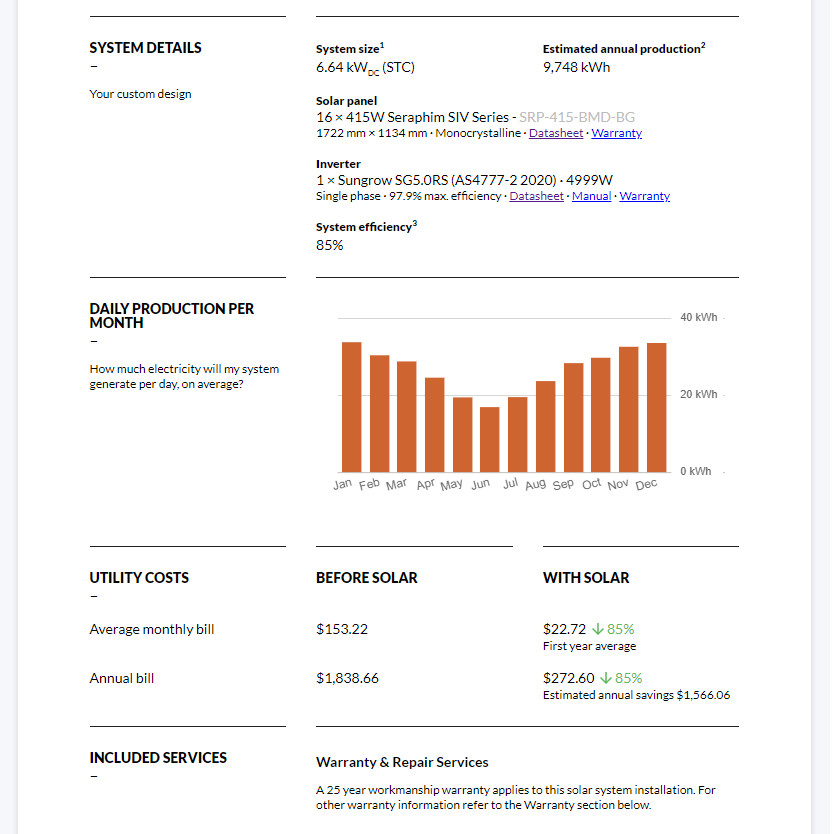
Your proposal outlines the total cost of your solar system, giving you a detailed breakdown of components such as panels, inverters, and batteries from leading brands like Seraphim, CanadianSolar, Sungrow, and TESLA. Additionally, you’ll find estimates of potential energy savings and payback periods, as well as information about warranties and performance estimates. If you’re considering financing, the proposal will also detail options that can make your solar transition financially manageable.
Once you’re completely satisfied with your customised proposal, and if you’ve secured financial approval, it’s time to make everything official with a contract signing. Our transparent contract will clearly outline the terms, conditions, and all project particulars, ensuring you’re fully aware of what you’re committing to. We’ll take the time to walk you through each clause so you’re comfortable with the details. Upon signing, you’ve made a formal commitment to proceed, allowing us to handle any required paperwork and permits.
Step 6: Organising Finances
After finalising your contract, the next crucial step is to organise your finances, as payment for the solar system is generally due on or before the installation day. If you’re paying in cash, we’ll guide you through the straightforward payment process. Alternatively, if you’re taking advantage of our tailored solar financing options, we’ll assist you in finding a plan that aligns with your financial situation. Many of these options require no upfront costs, and your system essentially begins paying for itself through the energy savings you accumulate each quarter.
Securing financing isn’t a cumbersome process; we help you every step of the way. This usually involves submitting necessary financial documentation and undergoing a credit assessment. Once your financing is approved, it acts as a go-ahead signal for us to proceed with the upcoming stages, from securing permits to the physical installation of your solar system. With the finances in place, you’re one step closer to enjoying a more sustainable and cost-effective energy solution for your home or business.
Step 7: Tech Check
After your contract is signed, our team rolls up its sleeves to get started on double checking your planned solar installation – what we call a “tech check” – this involves an Accredited Engineer who is a CEC-accredited solar designer remotely reviewing your home, roof and the planned solar installation including its size, products and placement. This ensures we order the right products and your system is perfect for your home.

Step 8: Grid Connection Application
After the solar solution has been approved by the accredited engineer, our tech team will start work on obtaining the necessary approvals to move forward with your solar installation.
Electricity distributors own and maintain the infrastructure that delivers electricity from power stations to your property. They are responsible for ensuring that the electricity grid can accommodate new connections, including solar panel systems. As part of this, they require pre-approval sign off prior to us commencing with the solar installation.
Each energy distributor has their own set of rules and guidelines that can affect your application so submitting these documents for approval is an intricate task that requires precise attention to detail. It involves gathering various technical specifications about your proposed solar installation, from its capacity to its location, and carefully presenting this information in accordance with the regulations set by your local electricity distributor.
Once the Grid Connection Application is approved, we can then proceed with ordering/securing product stock and scheduling an install date.
Step 9: System Installation
This is the day you’ve been waiting for – installation day. Our Clean Energy Council (CEC) accredited installers will arrive at your property to bring your solar vision to life. Installation can usually be completed within a day for residential systems, though more extensive commercial installations might take a bit longer.

We ensure a smooth process by pre-organising all necessary equipment, panels, inverters, and wiring so it’s ready for rapid deployment. Our team starts between 7am-9am and will have an initial meeting with you to discuss important details such as panel and inverter locations, safety considerations, and your Wi-Fi details for monitoring setup. The team will set up safety measures, and then proceed to mount the solar panels on your roof using durable racking systems. Following this, inverters and batteries, if you’ve opted for them, will be installed and connected to the panels.
After the physical installation is complete, initial tests are run to confirm that everything is working as it should be. This ensures that once the system is given the final go-ahead, it will be both efficient and safe.
When the installers leave, your inverter will be switched off until the following steps are complete.
Step 10: Certificate of Compliance (COC)
Once the system is installed, the next crucial step is to ensure it meets all relevant Australian standards and regulations. For this, depending on what state and energy distributors you are with – a safety check and final review of the system is performed. This isn’t a quick glance-over; it’s a comprehensive examination that looks into various elements like wiring, inverter and panel installation, and safety switches, among other things.
In Queensland and New South Wales, this safety check is done by the electrician who installed your solar at the time of installation. They perform a thorough step-by-step check of the system and then sign the Certificate of Compliance for your solar installation. Occasionally these are audited by a third-party inspector, but not regularly.
In Victoria this involves an independent solar inspector checking your new solar solution to ensure your system is safe, that it complies with regulations and that it is performing as expected – according to guidelines laid out by the Clean Energy Council and state electrical requirements. Should there be any discrepancies, the inspector provides feedback to be addressed before re-assessment. This ensures that your system is not just installed but is also compliant and safe.
Upon a successful review, a Certificate of Compliance (COC) will be issued. This certificate is more than just a piece of paper; it’s your assurance that the installed system meets all regulatory standards and is safe for operation. It’s also often necessary for claiming government rebates, ensuring your grid connection is approved, and for warranty purposes. So, this step is crucial for both your peace of mind and for formalities down the line.
Step 11: Grid Approval, Connection & EWR
After the inspection is successfully completed and the Certificate of Compliance (COC) is issued, the team at Arkana then start work on preparing the required documentation for your Electricity Work Request (EWR).
An EWR is an official document submitted to your electricity distributor to seek approval to connect your new solar system to the grid. It notifies them about new installations and formally requests actions such as connection, disconnection, or alterations to an electrical system. It also provides details like the size of the solar system, inverter specifications, and other crucial technical data. As solar energy systems often feed surplus electricity back into the grid, the EWR informs the distributor of your plans, allowing them to make any necessary adjustments to their infrastructure.
Once submitted, the electricity distributor will review the EWR. They may require additional information or even a site visit, but rest assured, we liaise with them throughout this process to make it as smooth and swift as possible. Once approved, your solar panel system can be connected to the grid, enabling you to begin generating your own solar energy and potentially earning feed-in tariffs for any surplus energy you feed back into the grid.
At Arkana, we don’t just wait for these approvals to happen; we actively manage the process. This involves diligent follow-up with regulatory bodies and providing any supplementary information they may require. Whether it’s specific engineering documents or clarifications about your property, we’re on it. All these efforts are to ensure your solar system is fully compliant and ready to go live as soon as possible. Rest assured, we keep you updated at every stage, streamlining the process to get your system up and running as soon as possible.
Step 12: Solar Meter Setup
After your solar system has grid approval and received its Certificate of Compliance, it’s time for the final step – ensuring your energy meter is setup for solar.
Your energy retailer is usually responsible for facilitating any required meter upgrades or adjustments.
Most homes these days are already fitted with a smart meter and do not need to be physically changed – the meter can be reconfigured remotely to read the export of the solar PV to the grid.
Some meters will need to be upgraded which we would have made you aware of during the proposal stage and which your retailer will speak to you about scheduling a time to perform the physical installation or upgrade. Your energy retailer will guide you through any specific requirements and costs, and let you know direct once the solar meter is up and running. Once the meter is setup, you’re ready to start generating your own renewable energy.
Step 13: System Activation and Monitoring
As soon as your energy retailer confirms the solar meter is ready to go, the time has come to activate your solar system.
You can now switch on your inverter, following the instructions we send you and your solar system will come to life and if the sun is out – you’ll now be generating your own power!
Once live, you can now start monitoring the energy you’re producing, using and exporting to the grid (earning feed-in tariffs) using the inverters own monitoring app or more advanced monitoring solutions.
With these monitoring tools, you can easily keep an eye on how much energy you’re generating, how much you’re saving, and even how much you’re contributing back to the grid.
![]()
Step 14: Changing Your Energy Usage
Now that your solar system is up and running, it’s time to consider some smart changes to your daily energy habits to maximise your solar benefits.
For example:
- Aligning your daily energy usage with your solar generation.
- Timing your appliances to run during the day
- Maximising your energy provider’s peak, off-peak, and shoulder rates
- Choose a solar friendly energy provider.
By adapting your energy usage to your solar production, you not only increase your own savings but also contribute to a more sustainable energy grid.
Step 15: Regular Maintenance & Performance Reviews
Your solar panel system is an investment in both your financial and environmental future. Just like any investment, it needs care and upkeep. Regular maintenance ensures that your system operates safely and efficiently.
Factors like dust and debris, water seepage, pests, and even weather conditions like hail and wind can affect your solar panel system’s performance. Routine checks and servicing mean you can rest easy knowing your solar panel system is safe and that you’re making the most out of your energy savings.
It’s also a good idea to regularly review performance of your system to review whether the system is operating at its peak efficiency or if there are adjustments you could make, such as modifying energy usage patterns, to further optimise your savings and environmental impact. This can also help you decide if adding a battery or other products such as a solar diverter could further optimise your setup.
Final Step: Sit Back, Relax & Enjoy The Benefits
Congratulations, you’ve successfully navigated the journey to becoming a solar energy producer! You’re now part of Australia’s sustainable energy future. With the system activated and your new energy habits in place, you can look forward to lower electricity bills and the satisfaction of reducing your carbon footprint. Our ongoing support doesn’t end here; we’ll continue to offer you insights, performance reviews, and helpful tips to ensure you get the most out of your investment. So, sit back, relax, and enjoy the multitude of benefits that come with your Arkana Energy solar system.
And now that you’re all set, the only thing left to do is brag a little! Tell your mates about your brilliant Arkana experience and how you’re saving the planet one sunny day at a time. Don’t forget to leave us a glowing review so more Aussies can join the solar revolution. Cheers!