
Sungrow WINET Dongle: Initial Wi-Fi Setup / Connection / Reconnection Guide
Sungrow WINET Dongle: Initial Wi-Fi Setup / Connection / Reconnection Guide
Setting up (or reconnecting) your Sungrow inverter with the WINET Dongle allows you to seamlessly track your solar system’s output and efficiency. This dongle is distinct, marked by its 3 lights labeled “RUN”, “WLAN”, and “LAN”. It’s crucial to follow the specific connection steps for the WINET Dongle to ensure you’re accessing accurate, real-time data from your solar installation.
Note: If your dongle displays lights labeled “RUN”, “COM”, and “NET”, you might be looking at the WLAN Dongle. For instructions on connecting the WLAN Dongle, please check out our WLAN Connection Guide. You can also download this guide as a PDF here.
1. Correct Dongle Check
Does your Inverter dongle look like this?

If so, then you’re in the right place.
2. Download the Sungrow iSolarCloud App
On your smartphone or tablet download the Sungrow App called iSolarCloud:


3. Scan the QR Code
Next, you need to scan the QR code on your inverter dongle.
Make sure your phone is connected to your home WiFi then open the iSolarCloud App.
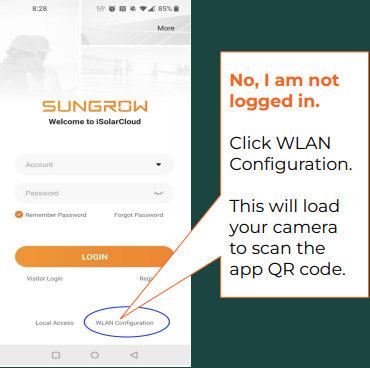
- If you are not logged in to the app, click WLAN configuration on the app homepage.
- If you are logged into your app click “Support” down the bottom then click on “WLAN Configuration”

The app will now automatically load your camera to scan the QR code on the Wi-Fi dongle. Your camera may ask for permission to scan. Please allow permission if required.
Scan the QR code on the front of the dongle.

After scanning your dongle you should get this message to confirm.
Click “confirm” to proceed

4. Connect Your Inverter To Wi-Fi
Once you have successfully scanned your QR code, you now need to connect the inverter to your wi-fi network.
Ensure the WiNet dongle is plugged into the inverter and powered on and follow these instructions in the app.
- Click on “Network”.

- Select your home wifi network. If your network does not show click the refresh icon circled in the below photo in blue to reload the available wifi in range. If you have both 2.4G and 5G WiFi only select the 2.4G as the dongle will not connect to the 5G.

- Your system will attempt to connect to your home wifi

- Once you receive this message saying “Successfully Connected” you can click on “Complete”
The process is now complete.
The information can take up to 10 minutes to start showing in your app so please allow some time for this to show online.

5. Troubleshooting – Connection Failed
If you receive the failed message it is most commonly due to an incorrect password entered. Please click “Try Again” and re-enter the password.
The second most common reason is you are not connecting to the 2.4G Wi-Fi frequency. Check in your phone Wi-Fi available networks, if you have 2 networks and 1 has 5G at the end of it please select the one that does not have 5G at the end.

If you keep getting the failed message click “Wlan Direct Connection” to try using a different process

6. Troubleshooting – WLAN Direct Connection process:
-
Press the orange button 3 times fairly quickly and then click continue.

-
On the following screen click “Go to set”

-
Select the Sungrow wifi this will be SG-xxxxxxxx. Once connected your device may say “No Internet” This is normal. Once connected click the back arrow circled in blue in this image.

- If prompted click “Connect” to connect to the wifi network for your inverter

- Select your home wifi from the list available (click the refresh icon if your network is not showing. Enter your home wifi password and click “OK”

Your system should now connect